Category Archives: StoryWeaver Software

StoryWeaving – Getting Started

Step 2 from the more than 200 steps in our StoryWeaver Story Development Software:
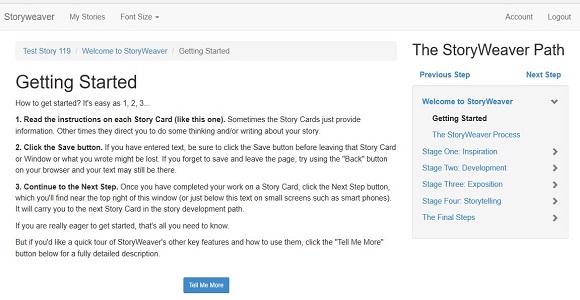
Getting Started

How to get started? It’s easy as 1, 2, 3…

1. Read the instructions on each Story Card (like this one). Sometimes the Story Cards just provide information. Other times they direct you to do some thinking and/or writing about your story.

2. Click the Save button. If you have entered text, be sure to click the Save button before leaving that Story Card or Window or what you wrote might be lost. If you forget to save and leave the page, try using the “Back” button on your browser and your text may still be there.

3. Continue to the Next Step. Once you have completed your work on a Story Card, click the Next Step button, which you’ll find near the top right of this window (or just below this text on small screens such as smart phones). It will carry you to the next Story Card in the story development path.

If you are really eager to get started, that’s all you need to know.

But if you’d like a quick tour of StoryWeaver’s other key features and how to use them, click the “Tell Me More” button below for a fully detailed description.

Tell Me More…

StoryWeaver’s Key Features
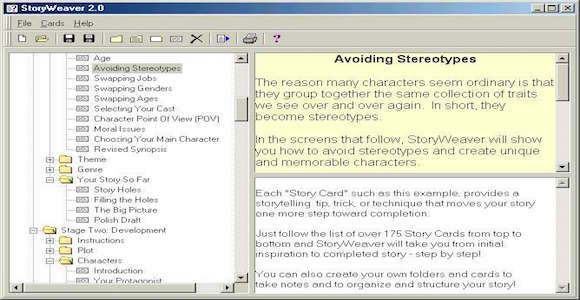
Story Cards

StoryWeaver consists of more than 200 interactive Story Cards that take you from concept to completion of your story step by step. Each Story Card covers one dramatic topic in the StoryWeaver story development path. Sometimes cards just provide information to get you ready for the next kind of development you’ll be doing. But most cards ask you to answer a question about your story, develop a concept, or pull several of your ideas together into an integrated story thread. That’s why it is called StoryWeaver – you are guided step by step to weave together all the threads of your story into a tapestry the fulfills your original vision.

Story Development Box

On Story Cards that ask you to work on your story you’ll find a Story Development box where you can enter text in response to the Story Card’s topic. The point of each topic is to do some thinking about an aspect of your story and then describe how that topic applies specifically. You can write as little or as much as you like, but quality is always more important than quantity.

The SAVE Button

Directly below the Story Development area is the Save button. Be sure to click the Save button before leaving a Story Card or your work on that card won’t be saved. Very important safety tip! But should you forget and click on another card, you can usually use your browsers Back button to return to the previous story card, and most often your work will still be present in the Story Development box so you can still save it. Who says there are no second chances?

On most devices you can also right-click on any text field and select Undo to removes changes to your text that you have recently made. This can be especially useful if you accidentally delete the text you have entered.

The References Box

After you’ve responded to a few Story Cards, you’ll see a References box show up just above the Story Development box. The References box quotes your responses to previous Story Cards to help you respond to the topic of the current Story Card. This is one of StoryWeaver most powerful features and is at the core of the StoryWeaver process. By folding your previous work into your current work, you continuously integrate your ideas, build on your story’s central concepts, and create a rich and detailed story world.

Action Buttons

Directly below each topic are the Action Buttons. Some of these are links to helpful in-depth articles on story development that are pertinent to that Story Card’s topic. Others may open an informational video or an example to illustrate how to respond to this topic.

Every Story Card has a Notes and Story button. Click on the Notes button to open a window where you can jot down any creative ideas that may come to you while you are working on that story card. The Notes window is free-form – use it as you like. The Story button opens another text window where you can jump ahead and start writing your story if you like. Perhaps you have a first draft already written and want to paste it here so you can revise it as you go. Or, you might suddenly get an inspiration about how you want to begin your story and write your opening lines down while the notion is hot. In a nut shell, the Story button is where you go when you want to jump ahead of Story Development for a bit and work on your overall story.

Many cards have a Tell Me More button that provides additional information about the topic being covered. And some cards have buttons that link to in-depth articles that inform the topic at hand, or provide an example to illustrate one way of responding.

The StoryWeaver Path

This is the collapsible menu to the right on larger screens and at the bottom of each Story Card on smaller screens. It outlines the entire 200 topic story development path. Normally, you only use the Next Step and Previous Step buttons just above that collapsible list, but you can click directly on the list should you want to go back and change an earlier response or expand the list to see what’s coming up.

The “My Stories” Menu

At the top of each Story Card is the My Stories menu. It allows you to create or delete a story project, open one you’ve been working with, or rename a story project. You can work on as many stories at a time as you like – just create a new story project for each. StoryWeaver saves your stories securely on our server, and you can also download all your story text (everything you’ve written in StoryWeaver) any time you like in a text file. Just click on the My Stories menu and select Download Story Text for any given story project.

The “Font Size” Menu

Click the Font Size menu to make all the on screen text (including what you write) larger, smaller, or back to default so that you can maximize readability on any size screen.

The “StoryWeaver” Link

In the upper left corner of every Story Card is the word “StoryWeaver.” It leads to the StoryWeaver home page where you can learn all the latest StoryWeaver news and contact us with questions, comments or (hopefully not) problems.

You Are Here

Directly below the StoryWeaver link is a “You are here” address that shows where you are in the process. On this Story Card it looks like this: “My Story / Welcome to StoryWeaver / Getting Started.”

Final Notes

That’s all there is to it. StoryWeaver is powerful in how it guides you to develop your ideas into a fully crafted story, yet it is also streamlined and easy to use.

Still, if you run into any problems, let us know and we’ll help you get back on track.

Welcome to StoryWeaver

Here’s step 1 in our 200 step StoryWeaver story development software.  Follow the steps and you’ll go from concept to completion of your novel or screenplay.  Look for a new step to be posted each week.

Step 1 – Welcome to StoryWeaver

Welcome to StoryWeaver – your step by step path to a completed novel, screenplay, or other narrative manuscript.

StoryWeaver is so named because it employs a technique for drawing story threads from your original concept much as a weaver might draw thread from wool. Step by step you grow and clarify your story as you twist the threads into a yarn, spin that yarn, and eventually weave it into the tapestry of your story.

Whether you already have a story you wish to improve or are just starting out with no more than a concept, StoryWeaver will help you grow your story, adding power to your plot, passion to your characters, humanity to your theme and richness to your genre.

StoryWeaver isn’t a web site, an organizational tool, or a series of fill-in-the-blank questions, but a sophisticated story development program. It runs on our servers and is accessed through your web browser, so you can use it on any internet connected device. As you work with your story, you can move seamlessly from laptop, to tablet, to smart phone, and from Windows to Mac, iOS, Android, or Chrome so you can follow your Muse wherever she leads.

To start weaving your story, click the Next Step button near the upper right corner of this screen, or just below this text on smaller screens such as smart phones, and may the Muse be with you!

Try StoryWeaver Risk-Free for 90 Days!
Click for details…

How “StoryWeaver” Came to Be

When Chris Huntley and I created the Dramatica Theory of Narrative Structure back in the early 90’s, we originally envisioned it as the end-all of story models – the one single paradigm that explained it all. In fact, it was – but only in regard to the mechanics of stories.

Although Dramatica proved amazingly popular, and the Dramatica software we designed (along with Steve Greenfield) became the best selling story structure tool ever created, I began to feel there was something missing.

In spite of (or perhaps because of) its power, depth, and accuracy Dramatica required a huge learning curve. What’s more, though writers could intuitively tune in to its truth and vision it somehow left the user cold in a passionate or creative sense.

To compensate for these issues, we eventually carried the software through three complete major versions, each seeking to make the story development process more involving and accessible. After considering the last of these efforts, I came to realize that there was only so far you could go in an attempt to turn a logical model of story structure into a warm fuzzy teddy bear of inspiration.

So began a personal eight-year journey on my part to connect with that other “touchy-feely” side of story development. What I wanted was simple – the passionate counterpart to Dramatica: a simple, easy to follow, step-by-step approach to story development that goosed the Muse and never required an author to deal directly with theory or to drop out of creative mode in order to make logistic choices. In short, I wanted to create a means by which writing would become fun, easy, powerful, and meaningful and still hold true to the structural insights of the Dramatica Theory.

The result was a whole new system of writing which I called “StoryWeaving.” StoryWeaving is just what it sounds like: the process of weaving together a story. Picture an author in front of a loom, drawing on threads of structure and passion, pulling them together into something that will ultimately be both moving and meaningful, that will capture human emotion and present it in a pattern that makes logical sense.

Authors work best not when they simply let themselves go in an aimless fashion, nor when they adhere to a strict framework of structural imperatives, but rather, they maximize the fruits of their talents when they are free to move through both worlds on a whim, drawing on such elements of structure and passion as play across their minds at any given moment.

Having devised a method of assisting authors in embracing this freedom, I designed the StoryWeaver software to transform the concept into a practical tool. Within the first year of its release, StoryWeaver came to outsell Dramatica on my online store by a margin of six to one, and outsold all other products that I carry combined!

Still, as simple and straightforward as StoryWeaver is to use, many authors craved additional details about various StoryWeaving concepts. To include that degree of depth in the software would bog down the process. So, I began a series of StoryWeaving Tips to elucidate on particular areas of interest, and to enhance the StoryWeaving path with small excursions onto creative side-streets.

This web site is a compilation of the complete collection of all of these creative writing tips to date, mixed in with tips for story structure as well.

I leave you to explore these new worlds on your own.

Melanie Anne Phillips


A World About Inspiration for Writers

Inspiration can come from many sources: a conversation overheard at a coffee shop, a newspaper article, or a personal experience to name a few.

And, inspiration can also take many forms: a snippet of dialogue, a bit of action, a clever concept, and so on.

One thing most inspirations have in common is that they are not stories, just the beginnings of stories. To develop a complete story, you’ll need a cast of characters, a detailed plot, a thematic argument, and the trappings of genre.

But how do you come up with the extra pieces you need?

In the questions that follow StoryWeaver will help inspire you, even if you can’t come up with an idea to save your life!

Learn more about StoryWeaver at Storymind.com

The StoryWeaver Method – Step 1

StoryWeaver is a step by step approach to developing your novel or screenplay.

StoryWeaver will help you create your story’s world, who’s in it, what happens to them, and what it all means.

In this first step, we look ahead to the process and outline the four stages of development common to all authors.

There are four stages to StoryWeaver’s story creation path:

1.  Inspiration

2.  Development

3.  Exposition

4.  Storytelling

In the Inspiration section, Storyweaver will help you come up with ideas for your Plot, Characters, Theme, and Genre.

In Development, you’ll flesh-out these ideas, adding details and making all the bits and pieces work together in harmony.

Exposition will help you determine how to reveal your story to your readers or audience, story point by story point.

The Storytelling stage is where you will develop a sequential plan for how your story should unfold, scene by scene, chapter by chapter, event by event.

By the end of the path, you’ll have a completed story, fully developed, expertly told.

Continue to next step…


The StoryWeaver method  is taken from the

StoryWeaver Story Development Software

Created by Melanie Anne Phillips


StoryWeaver Writing Software Walk Through Video

When I created the first version of StoryWeaver way back in 2001, I had no idea it would fill such a creative niche for writers.  Yet all these years later, it is still the number one best-seller on my store for writers, beating out every other program, tool, or informational product by a landslide.

So why is StoryWeaver still so popular?  I believe there are two reasons:

First, StoryWeaver was designed with a Step By Step approach to story development.  You begin with your initial inspiration, then gradually make it richer and more detailed, one step at a time.

Second, StoryWeaver automatically quotes the text you wrote in earlier steps so you can fold that into the current step.  In this way, you always have a real story from the very first step, and it just gets deeper and more complete with each mini-revision you make, step by step.

There are more than 200 steps in StoryWeaver.  There need to be in order to give your story the shading and nuance you’d like it to have.  You build and grow your characters, chart and explore your plot, focus and support your message, and expand your genre until your story develops its own unique personality.

As you might imagine, I could go on and on about each individual step, why it is there, what it does for your story, and what it does for your Muse.  But that’s just because I honest to gosh think this program is so useful, I get a little gung-ho about sharing it.

I’ve gotten two kinds of emails from users over the years: Those who practically worship StoryWeaver and those who call it everything from “simplistic” to “overly complex.”  This always leaves me with a head tilt: how can it be both too simple and too complex?

The answer, of course, is that it is one thing to one writer and something else to another.  Each writer has his or her own style, though we all follow the same basic progression.  StoryWeaver (or any writing software for that matter) can’t be right for everyone, by definition.

So, I’d like to suggest you try StoryWeaver and see if it works for you – especially since we have a 90 day money back guarantee.  All you might lose is a little of your time, but what you might gain is a really useful tool that can open creative doorways, organize your inspirations, and lead you step by step to finishing your novel, screenplay or stage play.

You can get more details and/or purchase StoryWeaver HERE.

Thanks for listening, and I hope you find it worth your while.

Melanie

How to make StoryWeaver fonts larger in Windows

For most monitors, StoryWeaver text is a good, readable size in Windows.  But, on some higher resolution monitors, it can be hard to read.  While there is no font size adjustment in StoryWeaver, here is a work-around that really works!

Read all the following before trying it:

1.  Go to your control panel and in the search box, type “magnify.”

This will bring up an option to magnify the screen.  Click it and you go to a window that has windows accessibility options.  (If you hear a voice reading the screen, you can uncheck the narrator voice at the top where it says “always read this screen.”

2.  Select the box to turn magnifier on.

This will open a magnifier control window that allows you to set what will be magnified and by how much.

3.  In the “Views” menu in the magnifier box, select “full screen.”

When you do, your entire screen will magnify and you can move around by scrolling to the sides, top and bottom with your mouse.

4.  Use the “-” and “+” symbols in the magnifier box to make zoom greater or smaller.

5.  To exit magnification hold down the key with the Windows icon and the ESC key at the same time.

6.  You can pin the magnify function to your icon bar for easy access if you like.

The best part of this work-around is that you can magnify anything on your screen, not just StoryWeaver.  Give it a try and get into the details!

StoryWeaver Tip 1

StoryWeaver - Create New CardStoryWeaver has over 200 interactive story cards that lead you step by step from concept to completed story, but you can also create your own folders and cards.

Just go to the Cards menu and select New Folder or New Card.  You can even reference work you’ve done on other cards to appear on your new card!

This is useful for organizing your story ideas and research materials.  To get you started, there is already a Notes folder (see picture just below the menu in the main list) so you have a convenient place to store your information.